-
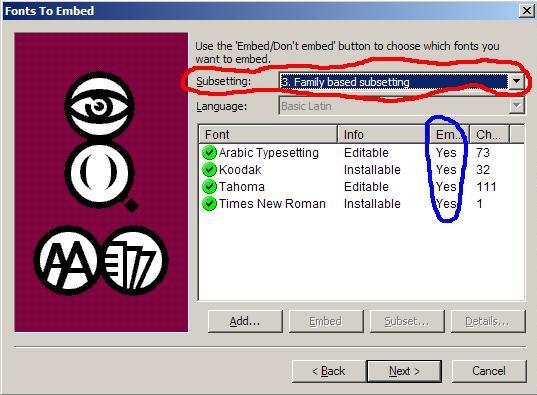
When the "Fonts to Embed" box comes up, note you need to
pay attention to two things:
Subsetting (circled in red)
and
Embedding (circled in blue)
-
Change the Subsetting to "7. No subsetting" by hitting the
down arrow in the drop-down menu. (This conflicts with the
warning to NOT choose Subsetting you may have seen in the
Microsoft documentation but as I said, Persian has special needs so
trust me on this one!)
and
Change Times New Roman (or some other fonts you don't care to embed)
to NO by clicking on the
name of the font then hitting "Don't embed". Then hit Next: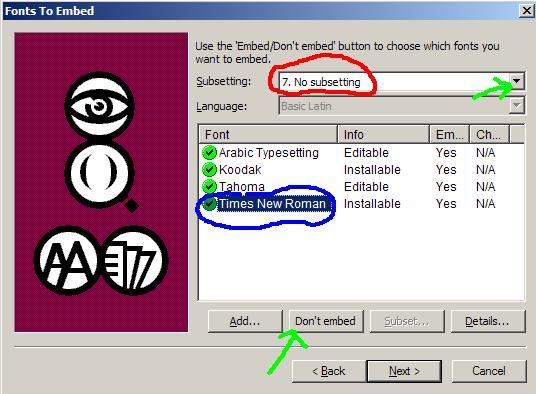
-
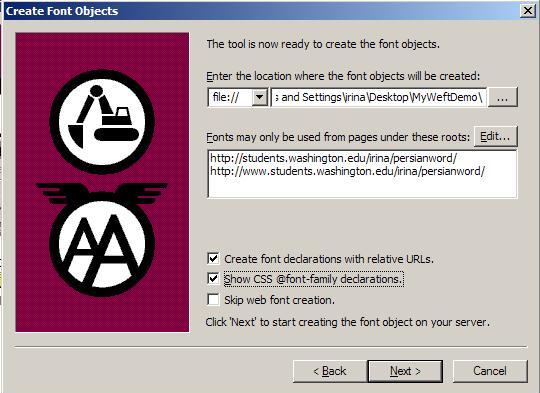
Now you come to the Create Font Objects box. Font
objects are files ending in .eot (make sure the extension
remains lower case and not .EOT) and they contain a compressed version
of your font which your website visitors will access just as
they access all your images and audio files, etc. They also contain info about
which webpage(s) the .eot may be used with. (A copyright
consideration.)
At the prompt for "Enter the location where the font objects will be
created", enter that same folder on your computer where you store your
webpage. (Recall Step 6) Again, by hitting the button with 3 dots, you can
browse around and look for it.
In the next box down, at the prompt for "Fonts may only be used from
pages under these roots:" you need to type any mirror sites that the
user may type in. The slash at the end of the URL is important. After
hitting Edit, I've typed in
http://students.washington.edu/irina/persianword/
and http://www.students.washington.edu/irina/persianword/
You must add all mirror sites and take intranets and variant addresses
into consideration.
This is, apparently the place where most people get into problems.
So, you might want to review the
Microsoft documentation on this point. (Look for 'Allowed roots',
also known as 'URL binding' about halfway down the page.)
Finally, check the box "Show CSS@font-family declarations even if you
don't have
a CSS file. Hit Next.
-
Keep your eye down on the status bar while you're
waiting for the eot files to be
created. It tells you which fonts it's working on and you can watch
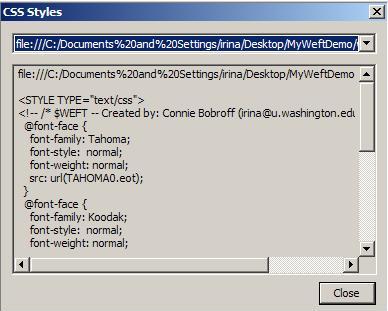
the progress. When the CSS styles box comes up, go
Control-c to copy the <style> info which you'll need to paste
(Control-v) at the top of your CSS file. (Tip: Even if you don't have
a CSS file, paste that into Notepad so you don't lose it!)
Hit Close.
-
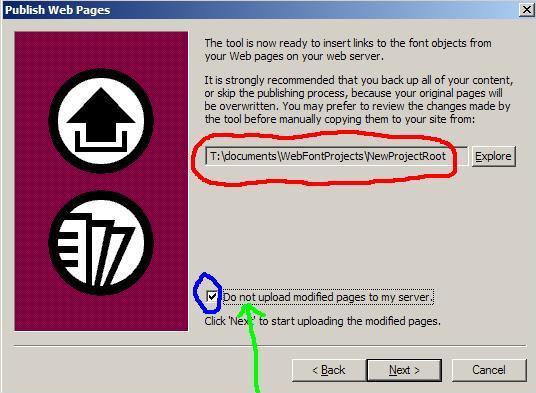
When you come to the Publish Web Pages box,
You might want to note the NewProjectRoot location (circled in red)
because when you're done, that's where you'll find the new version of
your webpage with the Weft info in the <style>. Weft created the
NewProjectRoot folder automatically and that's where it will
automatically, by default send the newly modified webpage. Also
be warned it's going to put the font objects (the files ending in .eot)
in the other folder as specified by you and discussed in steps 6 and
12.)
Be sure the Do NOT upload to server box is checked or you will have
some big headaches!
Hit Next.
-
In the Finished box, hit Finish!
In the next box, New Project, choose Save and save this
project you've just completed. It will prompt you to name it. Name
it anything you like, Save
and then close Weft.
-
Now you have to hunt for 2 things on your computer that
you will upload manually as you normally upload files to your server:
Your modifed html webpage file (look in documents\WebFontProjects\NewProjectRoot)
for the project you just named and saved in step 15.
and
The eot files. There is one
eot per font. (In my case, I have to look in C:\Documents and
Settings\irina\Desktop\MyWeftDemo). Also in this folder is my
original weft.htm file. I've crossed it out in green in the
picture below because it is not the modified one which is to be
uploaded to your server.
Note, sometimes WEFT goes ahead and makes an eot for fonts for which
you had earlier specified "Do Not Embed" . Just delete the eot it has made for
these fonts.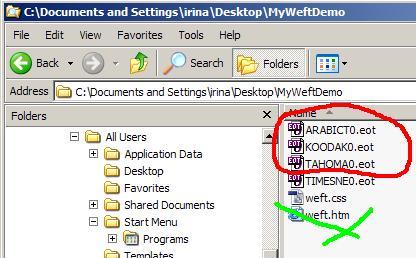
Now modify your CSS file (if you have one) by pasting the <style> info
to the top and pay attention
to the exact address of your eot and its relative location to the
directory containing your
html file. If you're not sure, just type the entire url.
It is usually easy to find the eot files. However, for some
reason, the modified webpage html file somehow often gets lost (or not
made??) so, if this should happen, rather than get frustrated,
just copy and paste the style info manually into the <style> section
of your original unmodified webpage. That's why I told you to copy the
CSS info into Notepad above in step 13.
Once you have uploaded the modified html file and modified CSS file
(if you have one) and your eot files (to
the correct directories!!) on your
server, you're done.
If you'd like to contribute
feedback on
this demo, please email: irina@u.washington.edu and be sure to say which versions
both of Windows & Internet Explorer you have and if you felt the
download time was longer than usual. I will summarize and post the
statistics and comments after I receive a few.
Questions on WEFT should be asked at the WEFT users
group: http://groups.msn.com/MicrosoftWEFTuserscommunity/general.msnw
<---BACK To previous page
|